 |
The Raspberry Pi
+ |
 |
 
November 2019
THIS PAGE IS
OBSOLETE
(Building Memu-Pi on
Raspbian)
See
this page for the current version of
Memu-Pi
MEMU-Pi
: Now with
MEMU-Pi is Bill Brendling's idea for implementation of
Andy
Key's Memotech Emulator,
MEMU, on a
Raspberry Pi (RPi).
For a complete description of the functionality of MEMU,
refer to the MEMU
page on Andy's site.
Introduction
Bill's first MEMU-PI implementations were based on building
the system on top of a base Linux (Raspbian)
operating system. Restrictions of the Raspbian GPL License meant
that a pre-built MEMU-PI system could not be distributed without
breaching the Raspbian license terms; the procedure for building a
system of your own was quite involved but full instructions for
building MEMU-PI on Raspbian are provided below.
Update June 2019 : This page describes
implementation of MEMU-Pi on top of the Raspbian Operating
System.
Making matters much simpler, Bill has now released a
bare
metal version of MEMU-PI. . This does not require an operating
system to be preinstalled on the PI, but, as with the GPL terms
mentioned below for the Raspbian implementation, Bill's
distribution includes some source files as he describes below in
the bare metal MEMU-PI page.
Most users will want to implement the
bare metal version, but instructions on how to build the
original version on top of Raspbian are preserved on this page.
MEMU-PI On
Linux (Raspbian)
As Bill notes, the Raspberry Pi is a perfectly good
Linux machine, and will run the standard MEMU very well. The
only requirement is to make sure you have the correct version of PortAudio installed. "sudo apt-get install portaudio19-dev" does
the trick (using "libportaudio-dev" does not work).
However, Bill had the idea of making it the Pi look like a
hardware emulator of a Memotech, with MEMU coming up full screen
as soon as you powered the device on. His intention was to
provide the same user experience as Andy's
REMEMOTECH, but with no more work than writing an SD card
and at much lower cost.
For PC users, since the whole system is built on a FAT32
formatted SD card, once MEMU-Pi has been loaded,
it is really easy to add new game or application files to the
MEMU directories using Windows, rather then needing to use any
low level file manipulation tools such as "dd".
Jump straight to the
download
Development History
Quote from Bill . . .
- Plan A was to create a version of MEMU that ran bare
metal (no operating system). However, reading the RPi
forums, while the display looks doable, the keyboard and SD
card seem to be problematic. So while this remains a long
term ambition, for the short term I have adopted plan B.
- [ Update June 2019 : The
Bare Metal version is now available
]
- Plan B is to keep a minimal Linux kernel to do the
difficult stuff, but have it boot in single user mode and
immediately bring up MEMU, Since I wanted full screen, and
to cut down the kernel and boot time, one of the things to
cut out was clearly X-window, and have MEMU write directly
to the display. At this point, MEMU-Pi uses
the Linux frame buffer device directly, and hence this
version is Linux only.
The initial incarnation of MEMU-Pi contained
code to build
two versions for Raspberry Pi; the normal windowed MEMU mode and a full screen
mode that could be invoked from the
Raspbian command line.
The current release also builds the
two command line versions, but also includes a stand-alone
version which boots straight into MEMU_Pi.
The
archive file contains all of the required files to set up
MEMU-Pi on an SD card, the source files are also
available, but are only required if you want to modify
MEMU-Pi and rebuild from scratch.
Getting Started
27/03/2014 Pre-built Image
Files - downloads no longer availableDue to
restrictions of the
GPL License, it is no longer
possible to distribute pre-built versions of MEMU-Pi
as the images contain compiled copies of the Linux
Kernel and some libraries, but not the source code
as required under the terms of the GPL license. Although the
source code is readily available, the GPL license mandates that
it must be distributed with copies of any binary that uses it.
You can read the
background to this issue by following
this link to the Raspberry Pi Forums where you
will find a diatribe from an anonymous member of RPi
forum about "software piracy"
and reiterates the GPL license restrictions. Whilst
I understand the intent of the GPL license to prevent the
distribution of proprietary or non-maintainable software built
on top of code released under the GPL license, I can't believe
that the goal was to make life more difficult for the end user.
The purpose of the pre-built images was to make
it easy for the casual MEMU-Pi user,
who could simply expand the compressed archive file
and copy it to a formatted SD card. Unfortunately,
this is no longer possible, and users need to build
MEMU-Pi from the source files and install it on
top of a copy of
the RPi Raspbian distro (available
from
the RPi site).
Full instructions are on my
MEMU-Pi Make Info page.
Please don't let this inconvenience discourage you from
trying and using MEMU-Pi, building it from the
source files is not particularly difficult, but requires a bit
more work that just copying the images that Bill originally
created - unfortunate, but c'est la vie !
Once you have built & installed MEMU-Pi,
come back to this page for a brief overview of its operation
(below)
To install the complete pre-built package, unzip all the files and copy
them onto a FAT formatted SD card. When copying the files,
ensure that you preserve the directory structure, including the
empty "dev" directory, which is required. Once copied, insert
the card into an RPi, and power up.
It should go through the first part
of the Raspbian boot sequence, and then bring up MEMU, ready to
play.
MEMU-Pi Operation
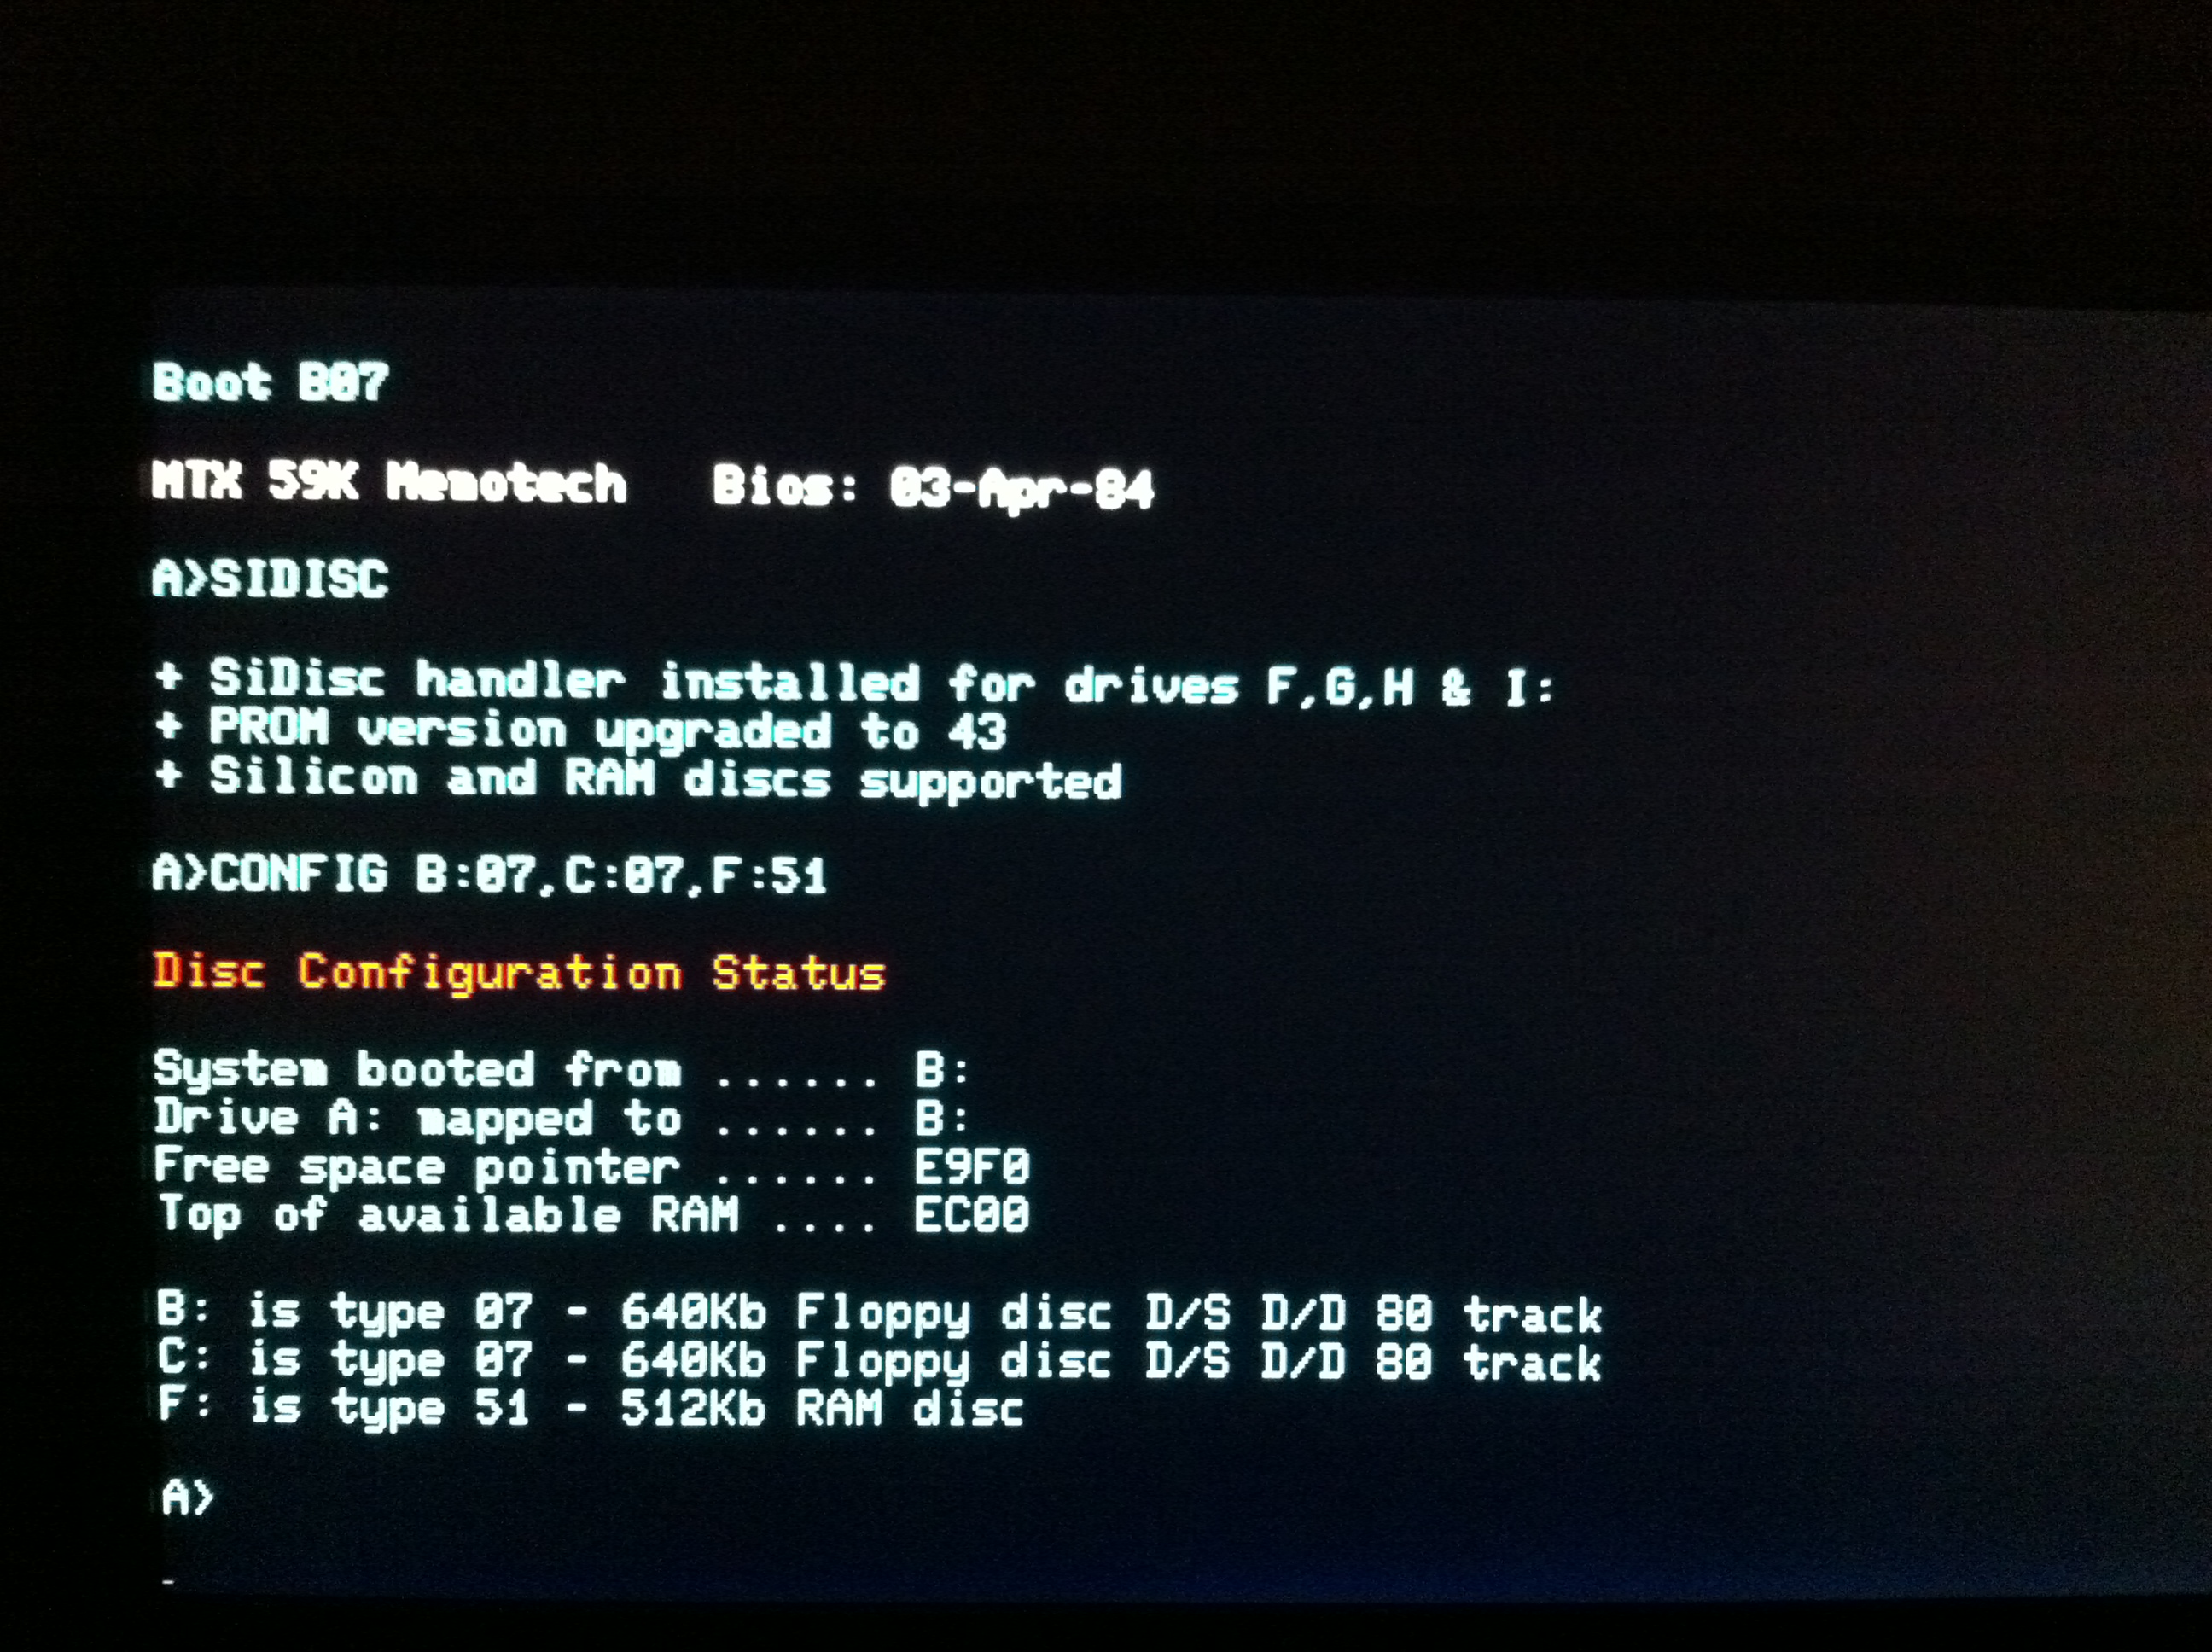
The image at the top of the page shows the screen output when
MEMU-Pi boots in colour CP/M mode.
Note: when running CP/M, many of the programs
available write to the emulated 40 Column MTX VDP screen, to
switch between the 40 column and 80 column screen to be
displayed on the RPi monitor, use "<ctrl> + <F1>"
and "<ctrl>" + "F2" key combinations (it must be
the left <ctrl> key).
MEMU-Pi Configuration Menu
The system can be configured using a configuration menu,
invoked by either the "Sys Req" key or "Scroll Lock" (this
alternative is required as X-Windows masks "Sys Req").
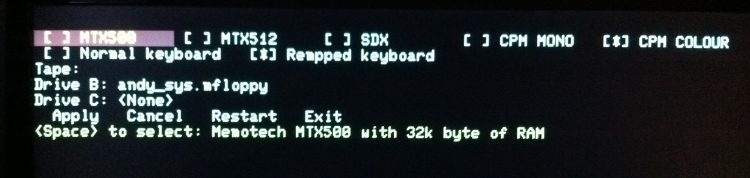
The menu is navigated with the cursor keys and
the options selected with the <Space> bar.
|
MEMU-Pi
Menu |
| Group |
Option |
Description |
| Hardware |
MTX500 |
Memotech MTX500 With 32k byte of RAM |
| |
MTX512 |
Memotech MTX500 With 64k byte of RAM |
| |
SDX |
Memotech with 576k bytes of RAM and two type 07
disks |
| |
CP/M MONO |
576k bytes of RAM, two type 07 drives, CP/M mono
monitor |
| |
CP/M COLOUR |
576k bytes of RAM, two type 07 drives, CP/M
colour monitor |
| Keyboard |
Normal Keyboard |
Keys match MTX keyboard - Not always PC key
symbols |
| |
Remapped Keyboard |
Keys match PC keyboard - Problems with some
games |
| |
Further details of the keyboard remapping function is described
on Andy's
MEMU keyboard page.
|
| Tape |
Select "tape" to load |
Use Cursor Keys to select the required tape
(.mtx) file |
| Drive B: |
Select "disk" to load |
Use Cursor Keys to select the required disk (.mfloppy)
file |
| Drive C: |
Select "disk" to load |
Use Cursor Keys to select the required disk (.mfloppy)
file |
| Action |
Apply |
Change disk and/or tape and continue MEMU |
| |
Cancel |
Continue MEMU with no changes |
| |
Restart |
Make changes and restart MEMU |
| |
Exit |
Exit MEMU and shutdown the Raspberry Pi |
| MEMU-PI
Distribution Files |
| |
| MEMU-PI On
Linux (Raspbian) |
|
27/03/2014 Pre-built Image
Files - downloads no longer available
For the foreseeable future, MEMU-Pi can only be
distributed in the form of source files.
As described above, due to
restrictions of the GPL License, it is no longer
possible to distribute pre-built versions of MEMU-Pi
and users need to compile the program from the
source files.
|
|
The full distribution of MEMU-Pi consists of MEMU, with my
configuration file patches, compiled on RPi, and
then with the minimum number of files from the
Raspian distro needed to boot. The result is
somewhat unusual for an RPi distro, in that there is
no Linux partition, everything is stored in the FAT
boot partition.
Hence there is no need to use dd (or Windows
equivalent) to install. Just unzip all the files and
copy them onto a FAT formatted SD card. When copying
the files, ensure that you preserve the directory
structure, including the empty "dev" directory,
which is required. Once copied, insert the card into
an RPi, and power up. It should go through the first
part of the Raspian boot sequence, and then bring up
MEMU, ready to play.
Bill Brendling
|
| Version |
Release Notes |
171202
 |
Source Files dated 02/12/2017
-
MTX serial I/O on real
serial ports. So it is possible to build a
proper NODE ring between computers. (Linux
specific)
-
Mapping MTX keyboard, printer and PIO ports
to GPIO pins, see
MTX-Pi. (RPi specific)
-
VideoCore GPU acceleration of screen
scaling. (RPi specific)
-
Loading and saving WAV files. (Should be
generic, but only tested on Linux (x86 & RPi)
This code is currently based upon Andy Key's from
a couple of years back. It does not contain Andy's
latest enhancements (it will not run hextrain). It
is also rather more Linux / Raspberry Pi specific.
|
|
0.05
|
22/06/2013 : Version 0.05 released
Source Files for Version 0.05
- Added support for Atari type joysticks
connected to the R-Pi GPIO header
Since this version uses direct memory mapping for
the GPIO, it is necessary to run this version of
MEMU-Pi as root. This is automatic if
running it as the minimal MEMU-Pi
distro, but if you run it from Raspian, you have to
use sudo.
To make it easier to run memu-pi
(as opposed to the other builds) from a full
operating system, Bill has added a "-os" switch.
With this switch on the command line memu-pi
returns to the OS on exit rather than shutting down
the RPi.
Full
instructions for building MEMU-Pi are
on the Make Info page. |
|
0.04
 |
07/04/2013 : Version 0.04 released
Version 0.04
- Pre-built for writing to SD Card
- Most of the changes were to improve the
interface of the MEMU-Pi code with
Andy's, and to align the file versions with
Andy's recent MEMU update.
|
|
|
Source Files for Version 0.04 Full
instructions for building MEMU-Pi are
on the Make Info page. |
|
|
Sample "memu_pi.cfg" file to set initial
options for MEMU-Pi. |
|
0.03
|
16/03/2013 : Version 0.03 released
Full Version 0.03 -
Pre-built for writing to SD Card
- Minor change to
Configuration Menu option colour scheme
|
|
|
Source Files for Version 0.03
Full
instructions for building MEMU-Pi are
on the
Make Info page. |
|
|
Sample "memu_pi.cfg" file to set initial
options for MEMU-Pi. |
|
0.02
|
13/03/2013 : Version 0.02 released - minor
update to configuration file code
- Changes to the configuration are now
correctly preserved.
- On program exit (either by Break key or from
the menu) the file system is synced and the
kernel is halted cleanly (no more kernel
panics).
- I have removed the dependency on
ncurses, which means that libncurses and
lintinfo can be removed from the distro.
This file contains only the new MEMU-Pi
executable - replace the existing memu-pi executable
in the SD card memu\ directory created from Version
0.01 |
|
0.01
|
24/02/2013 : Version 0.01 Released - "beta" version of
the full screen, stand-alone, MEMU-Pi
The first draft of Memu-Pi : pre-release for
testing
The distribution consists of MEMU, with my
configuration file patches, compiled on RPi, and
then with the minimum number of files from the
Raspian distro needed to boot. The result is
somewhat unusual for an RPi distro, in that there is
no Linux partition, everything is stored in the FAT
boot partition.
Hence there is no need to use dd (or Windows
equivalent) to install. Just unzip all the files and
copy them onto a FAT formatted SD card. When copying
the files, ensure that you preserve the directory
structure, including the empty "dev" directory,
which is required. Once copied, insert the card into
an RPi, and power up. It should go through the first
part of the Raspian boot sequence, and then bring up
MEMU, ready to play. |
+
Raspberry Pi
is a trademark of the Raspberry Pi Foundation, this website is
in no way affiliated to the Raspberry Pi foundation.
|